Cơ chế xử lý linh động trên Azure Databricks
Trong bài viết này, tôi sẽ chia sẻ về cơ chế mà một dự án Big Data đã thực hiện trên Azure Databricks để có được phương pháp xử lí linh hoạt và có thể cập nhật qua cấu hình.
Trong một dự án về Big Data gần đây, tôi phụ trách phần xử lí dữ liệu từ nhiều nguồn dữ liệu khác nhau, mỗi nguồn dữ liệu sẽ có từng quy trình xử lí khác nhau. Điểm mấu chốt đó là các quy trình xử lí này cần có khả năng cập nhật dễ dàng, việc tạo mới quy trình xử lí cần hạn chế tạo tác động tới những luồng đang có, ngoài ra còn có thể có thể cập nhật qua cấu hình.
Với những yêu cầu như trên, cả team quyết định sử dụng Azure Databricks cho Big Data Analytics service. Bên cạnh đó, tập tin cấu hình sẽ dùng định dạng JSON. Việc quan trọng đó là tìm cách nào để kết nối JSON và Databricks với nhau để hệ thống hoạt động linh hoạt và có khả năng cập nhật dễ dàng. Trong bài viết này, tôi sẽ chia sẻ về cơ chế mà dự án đã thực hiện trên Databricks để có được phương pháp xử lí linh hoạt và có thể cập nhật qua cấu hình.
I. Tổng quan Databricks
Azure Databricks là dịch vụ triển khai Databricks trên nền tảng Azure, cung cấp khả năng autoscale, tương tác với các thành viên khác dễ dàng thông qua workspace. Azure Databricks hỗ trợ nhiều ngôn ngữ như Java, Python, Scala… Trong dự án thì tôi sử dụng Scala và Python là ngôn ngữ chính.
Để có thêm nhiều thông tin, các bạn có thể tìm hiểu thêm trong các đường dẫn sau:
- Databricks website: https://databricks.com/
- Azure Databricks overview: https://azure.microsoft.com/en-us/services/databricks/
II. Quy trình xử lý linh động trong Databricks
Có một cách để hiết kế nền tảng Databricks đó là tạo một notebook cho mỗi data flow. Tuy nhiên cách này lại có một số nhược điểm như:
- Nếu data flow được bổ sung thường xuyên, đội ngũ phát triển sẽ phải tạo một notebook mới từ đầu.
- Cập nhật data flow rất tốn thời gian, và không phải flow nào cũng phù hợp với yêu cầu.
- Dù phát triển các tính năng giống nhau nhưng mỗi developer sẽ có cách làm khác nhau, gây khó khăn trong việc cập nhật
Trong khi đó, yêu cầu đặt ra là thực hiện cơ chế để xử lý cho nhiều luồng dữ liệu, hệ thống cần có tính linh hoạt và có thể cập nhật qua cấu hình để có thể thay đổi luồng xử lí theo nhu cầu. Vì thế, thay vì tạo riêng notebook cho mỗi luồng xử lí, tôi tạo một cơ chế như sau:
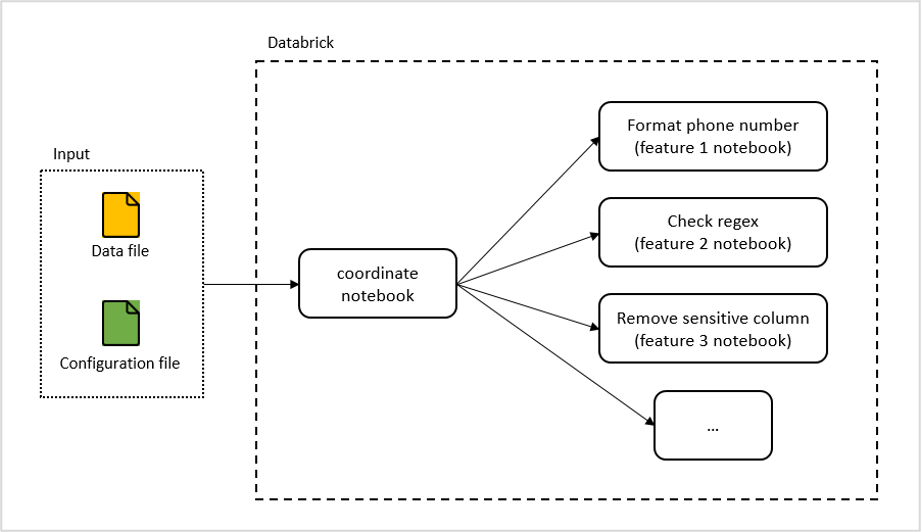
Giải thích cơ chế:
- Input: Tôi tạo một tập tin cấu hình cho mỗi luồng xử lí riêng biệt. Khi dữ liệu của một luồng được xử lí, các bước cụ thể của luồng xử lí sẽ được lấy từ trong tập tin cấu hình này.
- Coordinate notebook: notebook này có nhiệm vụ download input file, kiểm tra tập tin cấu hình và gọi các feature notebook theo như cấu hình để thực thi luồng xử lí dữ liệu.
- Feature notebooks: Các notebook này cung cấp nhiều khả năng xử lí dữ liệu khác nhau, và có thể được mở rộng tùy theo nhu cầu trong tương lai.
Tiếp theo, tôi sẽ thực hiện cơ chế mẫu cho 2 feature notebook: format phone number (định dạng số điện thoại) và remove sensitive column (xóa các cột thông tin nhạy cảm). Việc hiện thực hóa được thực hiện bằng Azure Databricks và Azure Storage Blob.
Đầu tiên, tôi tạo các common notebook để tải và ghi tập tin, tương tác với Azure Storage Blob. Download file notebook (scala):
1.  val storageAccountName = "<your_storage_account_name>"
2.  val storageAccountKey = "<your_storage_account_key>"
3.  // Get information from parameters
4.  val containerName = dbutils.widgets.get("containerName")
5.  val fileName = dbutils.widgets.get("fileName")
6.  val outputFile = dbutils.widgets.get("outputFile")
7.  val fileType = dbutils.widgets.get("fileType")
8.
9.
10. // Configure connection string
11. // In reality, you should use Key Vault instead of using key directly
12. spark.conf.set("fs.azure.account.key." + storageAccountName + ".blob.core.windows.net", storageAccountKey)
13.
14. // Remove the file if it exists
15. dbutils.fs.rm(outputFile, true)
16.
17. // Download csv file
18. if (fileType == "csv") {
19.     val dataDf = spark.read
20.     .option("header","true")
21.     .option("inferSchema", "true")
22.     .csv("wasbs://" + containerName + "@"+ storageAccountName+ ".blob.core.windows.net/" + fileName)
23.     dataDf.write.parquet(outputFile)
24. } else if (fileType == "json") {
25. // Download json file
26.     val dataDf = spark.read.json("wasbs://" + containerName + "@"+ storageAccountName+ ".blob.core.windows.net/" + fileName)
27.     dataDf.write.json(outputFile)
28. } else {
29. // Download text file
30.     val dataDf = spark.read.textFile("wasbs://" + containerName + "@"+ storageAccountName+ ".blob.core.windows.net/" + fileName)
31.
32.     val result = dataDf.collect().mkString("\n")
33.     dbutils.notebook.exit(result)
34. }
Write file notebook (python):
1.  val storageAccountName = "<your_storage_account_name>"
2.  val storageAccountKey = "<your_storage_account_key>"
3.  // Get information from parameters
4.  dataPath = dbutils.widgets.get("dataPath")
5.  output_container_name = dbutils.widgets.get("output_container_name")
6.  outputPath = dbutils.widgets.get("outputPath")
7.
8.  # Configure blob storage account access key globally
9.  # In reality, you should use Key Vault instead of using key directly
10. spark.conf.set("fs.azure.account.key.%s.blob.core.windows.net" % storage_name, storage_key)
11.
12. df = spark.read.parquet(dataPath)
13.
14. output_container_path = "wasbs://%s@%s.blob.core.windows.net/" % (output_container_name, storage_name)
15. output_blob_folder = "%stmpFolder" % output_container_path
16.
17. # write the dataframe as a single file to blob storage
18. (df
19.  .coalesce(1)
20.  .write
21.  .mode("overwrite")
22.  .option("header", "true")
23.  .format("com.databricks.spark.csv")
24.  .save(output_blob_folder))
25.
26. files = dbutils.fs.ls(output_blob_folder)
27. output_file = [x for x in files if x.name.startswith("part-")]
28.
29. dbutils.fs.mv(output_file[0].path, "%s" % (output_container_path + outputPath))
Tiếp theo, tôi tạo notebook để chuyển đổi định dạng số điện thoại thành định dạng chuẩn, và xóa những số điện thoại không thể định dạng được.
1.  import scala.util.matching.Regex
2.  import org.apache.spark.sql.functions._
3.
4.  // define function check
5.  def isPhoneNumberFormat() = udf((data: String) => {
6.    var pattern: Regex = "^[+]*[(]84[)]\\d{8,10}$".r
7.    if (pattern.findFirstMatchIn(data).mkString.length() > 0) {
8.      1 // correct pattern
9.    } else {
10.     val data2 = data.replaceAll("[+()-]|\\s", "") // remove  special character
11.     if (data2.length() > 11 | data2.length() < 10) {
12.       0 // not a format of phone number
13.     } else {
14.       100 // can be corrected
15.     }
16.   }
17. })
18. // define corrected function
19. def correctPhoneNumber() = udf((data: String, check: Int) => {
20.   if (check == 1 | check == 0) {
21.     data.toString // no need to correct
22.   } else {
23.     if (check == 100) {
24.       // replace first digit to +(84)
25.       data.replaceAll("[+()-]|\\s", "").replaceFirst("[0-9]", "+(84)").toString
26.     } else {
27.       data
28.     }
29.   }
30. })
31. // read paramter
32. val dataPath = dbutils.widgets.get("dataPath")
33. val colName = dbutils.widgets.get("phoneCol")
34. val keyCol = dbutils.widgets.get("keyCol")
35. val tmpColumn = dbutils.widgets.get("tmpColumn")
36.
37. var df = spark.read.parquet(dataPath)
38.
39. // execute check, return data frame with 3 column: key Column, corrected column, check column
40. df = df.withColumn(tmpColumn, isPhoneNumberFormat()(df(colName)))
41. df = df.withColumn(colName, correctPhoneNumber()(df(colName), df(tmpColumn)))
42. .select(keyCol,colName, tmpColumn)
43. df.show()
44.
45. // write to temp file and result
46. val outputPath = dataPath + System.currentTimeMillis().toString
47. df.write.parquet(outputPath)
48. dbutils.notebook.exit(outputPath)
Tiếp theo, tạo notebook để xóa các cột dữ liệu nhạy cảm.
1.  import org.apache.spark.sql.functions._
2.
3.  // read paramter
4.  val dataPath = dbutils.widgets.get("dataPath")
5.  val keyCol = dbutils.widgets.get("keyCol")
6.  val colNameStr = dbutils.widgets.get("column")
7.
8.  var df = spark.read.parquet(dataPath)
9.  val colNameLst = colNameStr.split("//")
10.
11. df= df.select(keyCol)
12. for( w <- 0 to colNameLst.length - 1)
13.   {
14.     df= df.withColumn(colNameLst(w), lit(1))
15.   }
16. df= df.drop(keyCol)
17.
18. // write to temp file and result
19. val outputPath = dataPath + (current_timestamp()).expr.eval().toString
20. df.write.parquet(outputPath)
21. dbutils.notebook.exit(outputPath)
Tiếp theo là tạo coordinate notebook.
1.  import org.apache.spark.sql.functions._
2.  import org.apache.spark.sql.types.{
3.      StructType, StructField, StringType, IntegerType}
4.  import org.apache.spark.sql.Row
5.  import org.apache.spark.sql.Column
6.
7.
8.  // Configure common feature notebook
9.  val downloadFileNotebook = "<path_to_download_file_notebook>"
10. val writeFileNotebook = "<path_to_write_file_notebook>"
11. val contraintFeaturesFolder = "<path_to_feature_notebook_folder>"
12.
13. val tmpFolder = "/tmp/"
14.
15. // These values are hard coded here, but you can update to get it from parameters
16. val dataFile = "user.csv"
17. val dataFileContainer = "input"
18. val validationFile = "user-configuration.json"
19. val validationFileContainer = "configuration"
20. val keyCol = "User_ID"
21.
22.
23. val hashString = (current_timestamp()).expr.eval().toString
24. // Download data file
25. val outputFileData = tmpFolder + "dataTemp" + hashString
26. dbutils.notebook.run(downloadFileNotebook, 60, Map("containerName" -> dataFileContainer, "fileName" -> dataFile, "outputFile" -> outputFileData, "fileType" -> "csv"))
27.
28. //download validation file
29. val outputFileValidation = tmpFolder + "validation" + hashString
30. dbutils.notebook.run(downloadFileNotebook, 60, Map("containerName" -> validationFileContainer, "fileName" -> validationFile, "outputFile" -> outputFileValidation, "fileType" -> "json"))
31.
32. // Read validation file
33. val constraintDF = spark.read.json(outputFileValidation)
34.
35. // Read data file
36. var dataDf = spark.read.parquet(outputFileData)
37. val dataOrginDf = spark.read.parquet(outputFileData)
38.
39. //Read constraint check
40. val conDf = constraintDF.select($"action", $"param.*")
41.
42. val tmpColumn = "tmpCheck"
43.
44. //create empty failzone dataframe
45. val schema = StructType(
46.     StructField(keyCol, StringType, false) :: Nil)
47.
48. // var failDF = spark.createDataFrame(sc.emptyRDD[Row], schema)
49. var constOutputLst = Array[String]()
50. // execute constraint check
51. conDf.collect().foreach(row => {
52.   var paramMap = scala.collection.mutable.Map[String, String]()
53.   paramMap("dataPath") = outputFileData
54.   paramMap("keyCol") = keyCol
55.   paramMap("tmpColumn") = tmpColumn
56.   // create param map
57.   for( w <- 1 to conDf.columns.size - 1)
58.     {
59.       if (row(w) != null) {
60.         paramMap(conDf.columns(w)) = row(w).toString
61.       }
62.     }
63.   // execute Check
64.   val outputPath = dbutils.notebook.run(contraintFeaturesFolder + row(0).toString, 60, paramMap)
65.   // add output file path to list for process later
66.   constOutputLst :+= outputPath
67. })
68.
69. var failDF = spark.createDataFrame(sc.emptyRDD[Row], schema)
70.
71. //Process constraint output file
72. constOutputLst.foreach (file => {
73.   val outDF = spark.read.parquet(file)
74.   // check to remove column, if returned dataframe not have key Column => remove column
75.   if (outDF.columns.filter(_ == keyCol).length > 0) {
76.     // get all column but keycol and tempCheck column
77.     outDF.columns.filter(_ != keyCol).filter(_ != tmpColumn).foreach(colName => {
78.       // update or add new column from output file
79.       val tmp = outDF.select(keyCol, colName)
80.       dataDf = dataDf.drop(colName).join(tmp, dataDf(keyCol) === tmp(keyCol), "left").drop(tmp(keyCol))
81.     })
82.     // add fail data to fail df
83.     failDF = failDF.union(outDF.filter(col(tmpColumn) === 0).select(keyCol))
84.   } else {
85.     // remove column
86.     outDF.columns.filter(_ != tmpColumn).foreach(colName => {
87.       dataDf = dataDf.drop(colName)
88.     })
89.   }
90.
91. })
92.
93. //save to correctZone
94. val correctZoneDF = dataDf.join(failDF, dataDf(keyCol) === failDF(keyCol), "left_anti")
95. if (correctZoneDF.collect().size > 0) {
96.   val dataPath = outputFileData + "output" + System.currentTimeMillis().toString
97.   val output_container_name = "output"
98.   val outputPath = dataFile
99.   correctZoneDF.write.parquet(dataPath)
100.      dbutils.notebook.run(writeFileNotebook, 60, Map("dataPath" -> dataPath, "output_container_name" -> output_container_name, "outputPath" -> outputPath))
101.    }
102.
103.    // Remove temp file if it exists
104.    dbutils.fs.rm(outputFileValidation, true)
105.    dbutils.fs.rm(outputFileData, true)
106.
107.    // return result check
108.    dbutils.notebook.exit("1")
Cuối cùng sẽ là bước kiểm thử luồng xử lí bằng cách upload data file và configuration file vào Azure Blob Storage.
Data file sample:
User_ID,Phone_No,User_Name,Password
24306,303-555-0011,achigeol,8[gxXvQDt9sTQX
65824,225-556-1923,hermathe,Q7#CDYrr?hdxnth6
14506,219-557-3874,stashero,Vq8#upVE7qj9_M+n
71463,215-558-9821,inghthlo,WXzshf8rU^ts8CUN
36808,262-559212-212,adeldona,8@6RvrbJzNg%Dws5
69170,319-660-9832,wdyalbow,r3^T8++f9MhVJe5h
17255,229-661-2134,introsgo,eXH8ENa8J!cd^P4
56940,216-662-8732,burienti,BSZC_vxPgTm^q4J%
52720,210-663-8724,itereart,A$F3Rtnc4b%Rtk
Configuration file sample:
[{"action":"remove-column","param":{"column":"Password"}},{"action":"format-phone-number","param":{"phoneCol":"Phone_No"}}]
Quá trình kiểm thử như sau:
- Upload data file với tên “user.csv” vào “input” container
- Upload configuration file với tên “user-configuration.json” vào “configuration” file
- Tạo “output” container
Những tên này được hard code trong coordinate notebook để phục vụ cho việc demo. Trong thực tế, ta sẽ lấy những giá trị này từ parameter hoặc configuration file. Sau khi đã chuẩn bị các tập tin, ta sẽ chạy coordinate notebook. Output file với tên “user.csv” sẽ được xuất ra trong “output” container. Nội dung kì vọng:
User_ID,User_Name,Phone_No
65824,hermathe,+(84)255561923
24306,achigeol,+(84)035550011
56940,burienti,+(84)166628732
71463,inghthlo,+(84)155589821
17255,introsgo,+(84)296612134
14506,stashero,+(84)195573874
69170,wdyalbow,+(84)196609832
52720,itereart,+(84)106638724
Cột Phone number được chuyển thành định dạng chuẩn, và cột Password được xóa khỏi dữ liệu.
III. Kinh nghiệm cá nhân
Khả năng cập nhật và tái sử dụng (configurable and reusable)
Với cơ chế như trên, các feature có thể được tạo mới hoặc cập nhật riêng biệt. Việc này giúp các feature có thể phát triển riêng biệt. Hơn nữa, một feature notebook có thể được tái sử dụng cho nhiều luồng xử lí khác nhau.
Lợi thế của cơ chế trên:
- Chỉ cần một tệp cấu hình cho mỗi processing flow mới. Với UI/UX, doanh nghiệp sẽ có thể tự cập nhật/tạo lập các flow.
- Hệ thống có thể được bổ sung tính năng xử lý mới mà không gây ảnh hưởng tới bất cứ thành phần nào khác. Chi phí phát triển một tính năng cũng rẻ hơn so với việc thực hiện một processing flow hoàn toàn mới.
- Các tính năng có thể được tái sử dụng cho các processing flow khác.
Trigger Databricks bằng Azure Logic App
Trong trường hợp cần tích hợp với các hệ thống khác, bạn có thể dùng Azure Logic App để trigger Databricks khi một tập tin dữ liệu được upload vào blob container. Các bước như bên dưới:
- Tạo Databricks Job để publish coordinate notebook, bạn có thể trigger job này để run notebook bằng Azure Databricks REST API
- Tạo Logic App để gọi Azure Databricks REST API nhằm trigger notebook. Logic App này có thể được trigger khi tập tin dữ liệu upload vào blob container
- Cấu hình blob container để gọi Logic App khi tập tin dữ liệu được upload
Cải tiến hiệu quả
Theo kinh nghiệm sử dụng Azure Databricks của tôi, việc chạy notebook từ một notebook khác có thể chậm hơn so với xử lí cùng notebook. Đó là vì các notebook cần thời gian khởi động trước khi chạy. Vì thế, nếu có quá nhiều feature trong luồng xử lí, bạn có thể cân nhắc các điểm sau để cải thiện performance:
- Thay vì dùng notebook riêng rẽ theo feature, bạn có thể tách notebook theo nghiệp vụ (gồm nhiều feature), hoặc mỗi luồng xử lí có một notebook riêng. Tất cả các feature cần thiết đều được hiện thực trong cùng notebook. Cơ chế này có thể làm giảm bớt tính tái sử dụng, nhưng có thể cải thiện performance.
- Build feature thành các thư viện và import vào coordinate notebook để gọi mà không cần phải thông qua các notebook khác. Mặc dù mỗi lần cập nhật tính năng sẽ cần phải cập nhật lại các thư viện, nhưng nếu nghiệp vụ không yêu cầu update thường xuyên thì cơ chế này phù hợp để cải thiện performance.
Kết lại, dù việc ứng dụng vào thực tiễn có có rất nhiều hạn chế và khó khăn, nhưng tôi hy vọng bạn sẽ tìm thấy vài điểm hữu ích giúp bạn hiện thực được luồng xử lí dữ liệu bằng Databricks.

